A coaxial indicator may be an overlooked tool. This comparatively cheap variety of an indicator is extremely useful, well worth the cost, and a simple and accurate way to take precision measurements. Coaxial indicators are used to find the exact center of bores or shafts. The design and readout is straightforward, making the coaxial indicator a great tool for any metrology workspace. We will explain how it works and what it is used for in order to introduce you to this handy tool, in case you do not know it already.
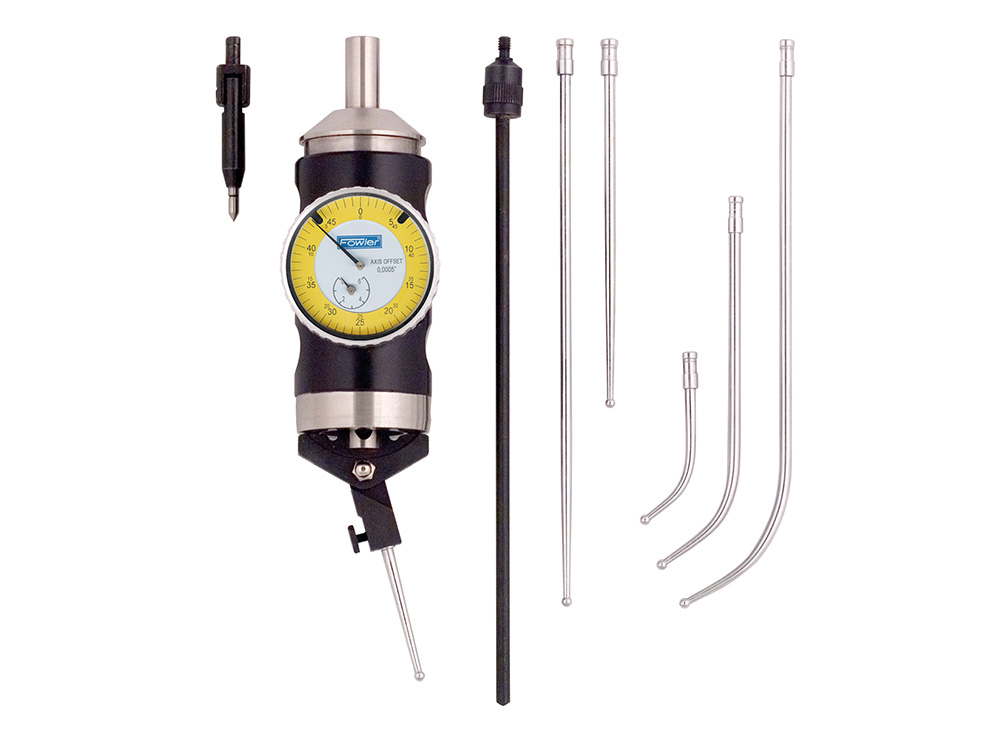
In any coaxial indicator set that you buy you will find: a spring-loaded probe for indicating center punch marks, inside probes of varying lengths, outside probes of varying lengths, an anti-rotation arm, and an inspection certificate. Probes often come in straight or bent design. When changing out different probes, there is no need for tools or to re-calibrate the coaxial indicator, an enormous advantage of this tool. With centering bores and other holes as its main purpose, the coaxial indicator can also be used to check the axial run-out of a workpiece to the spindle, to compensate the run-out errors of the spindle or tool holder, and to help complete a job that takes place at a distance (depending on the size of the dial). In terms of measurement accuracy, the coaxial indicator is high quality with typical centering accuracy of 0.003 mm / 0.0001″. When zeroed, the accuracy is generally within 1000ths.

When first using a coaxial indicator, it is important to check that the tool is functioning properly. Set up the probe of the coaxial indicator in the hole, let it spin, and assess whether it touches the edges and if it is as close as possible to the middle. Any movement on the dial indicates that the tool is not over the center. While it’s running, you can adjust the zero roughly so it’s in the middle. Then, when it is stopped, you can adjust the probe so that it’s in alignment with the x-axis and y-axis. Take another look while the coaxial indicator is running to assess improvement. The spindle should be right over the axis. Once you get the hang of this process, it becomes very simple and fast.
Now let’s talk about how the coaxial indicator works. When the extended arm is pivoted on its lever, it translates the left and right movement of the probe into the measurement readout on the dial. You will want to check that when turning the lever in circles there is no movement on the dial when the probe is not touching any surface. If necessary, you can take the coaxial indicator apart easily to make adjustments. Simply drop the pin out and remove the lever arm as well as the top. The slot holding the pin and lever may need some tightening so that the fit is snug enough. In the top part of the tool there is another pin that makes the dial gauge move up and down. The bearing surface on this top area rubs against this pin. Within a coaxial indicator, there are only two sources of inaccuracy that you really need to worry about. The first is the bearing surface and the second is the bottom circular surface where the probe arm is attached. If you have any issues, test these areas for accuracy and clean up the surface with a lathe while you have the tool disassembled. Adding a light coat of thin oil on the two bearing surfaces will prevent any potential gauling.
Importantly, any runout in how it is held makes no difference to the dial reading. When you introduce significant eccentricity, it does not matter in terms of the tools functioning. When the tool moves a great deal, the difference on the readout is miniscule. What does make a difference are the two faces, which are easily fixed by the operator. Do not be afraid to take it apart and check it. As an inexpensive yet valuable tool, the coaxial indicator is ideal for tuning up and adjusting yourself. One important note is to check the overall length before purchasing a coaxial indicator because it will impact how much height you need on your mill. Make sure you are buying the right size. Typically, you will need at least 6 inches of space on your mill.
In general, the coaxial indicator is a very useful tool. Using a coaxial indicator makes the process of finding the center of a bore or shaft fast and simple, the tool takes almost no time to set up, and if you have issues with readout accuracy, dealing with them yourself through minor adjustments is straightforward. Owning a coaxial indicator is well worth the cost. These tools are simple to use and provide accurate measurements.
Related Video
Shop Co-Ax Indicators
FREQUENTLY ASKED QUESTIONS
- How do I first set up my coaxial indicator?
After you purchase a coaxial indicator, you will want to test it before using it for an official measurement. It is important to check that the tool is functioning properly. First, you will set the coaxial indicator up in the holding tool and attach one of the probes. You want the probe to be positioned as close to the center of the bore you are measuring as possible. Second, turn on the holding tool so that the coaxial indicator is spinning. While it is in motion, you will assess both whether the coaxial indicator is touching the edges of the bore and whether it is properly centered in the middle. At this step, if there is any movement on the dial it is an indication that the tool is not over the center of the bore. Third, while it is still running, adjust the zero point roughly so that it is more centered. Fourth, stop the coaxial indicator from spinning and adjust the probe to align with the x- and y-axis. Fifth, let the coaxial indicator spin again to see whether the dial is moving and whether it is now properly centered. You may need to repeat these series of steps before it is in the middle. Once you have practice, this process it comes faster and simpler. If necessary, you can take the coaxial indicator apart to test the internal bearings and make any needed adjustments.
- How do I use a coaxial indicator to find the center of a bore?
Using a coaxial indicator to find the center of a circle is simple and can be learned quickly. Part of what makes this tool so great is how straightforward it is to use. First, set up the coaxial indicator. You will need to select the probe that is best-suited to the centering job you are completing. Curved probes are good for outside centering, straight probes are best for inside centering, and short and pointy probes are ideal when centering a center point. After selecting the appropriate probe, insert it into the indicator and tighten it with a wrench. Second, get the coaxial indicator ready for the mill. You will need to insert and secure a collet into your mill. Then you can mount the coaxial indicator into the collet and tighten the draw bar to hold it in place. Third, set up the mill itself. After attaching the coaxial indicator, you will want to set up the actual mill, typically on a low speed. Set your RPM and attach the handle to the coaxial indicator. Fourth, set up the workpiece. Eye up the workpiece so that it is centered across the x-axis and y-axis. Make any necessary adjustments to the coaxial indicator to properly center the part. Fifth, center the coaxial indicator on the mill. You are ready to take a measurement. Once the probe on the coaxial indicator is spinning, ensure that it is hitting the proper surface of your part all the way around and simply read out the measurement on the dial.
- Why should I consider purchasing a coaxial indicator for my workshop?
Owning a coaxial indicator is an excellent idea for any metrologist. These little tools are inexpensive compared to other precision measurement tools out there, but they provide a great deal of accuracy and precision. Simple to set up and use, there is no better way to measure the center point on a bore, shaft, arbor, hole, or anything else. Another advantage of the coaxial indicator is how straightforward it is to manually adjust. If your tool is slightly unbalanced or worn, the operator can disassemble the coaxial indicator, use a touch of light oil or smooth out the internal bearings to make it as good as new. Given the price of these tools, coaxial indicators are versatile measurement devices that are easy to operate, simple to maintain, and cheap to replace.
GLOSSARY TERMS
- Coaxial Indicator
A coaxial indicator is one variety of indicator used to measure the center of bores, shafts, arbors, holes, and more. When clamped into a tool holder, like a mill, the coaxial indicator is positioned at the center of the axes across the hole and the tip of a probe is adjusted to touch the surface around with the tool is being centered. Once on, the movement of the probe is translated into the measurement on the dial gauge. Coaxial indicators are versatile tools that come with a selection of inside, outside, straight, and bent probes, making them perfect for accurately measuring the center of a number of parts.