Invented in 1877 by Laroy S. Starrett, the founder of tool manufacturer L.S. Starrett Company, the combination square is one of the most essential and commonplace precision measuring instruments.
Developed as an improvement to the try square—a tool used to measure and mark 90-degree angles on pieces of wood—the combination square has many functions. But it’s best known for measuring and marking inside and outside angles. While it’s often associated with woodworking, the combination square is equally applicable to the work of a machinist.
Combination square design
The standard combination square is a simple tool made up of two parts:
- A removable blade, or a flat metal rule with a groove running down the center
- A square head, comprising a shoulder and an anvil, which you can adjust to slide down the ruler and lock at the appropriate measurement.
The shoulder is set at a 45-degree angle against the blade, and the anvil at 90 degrees, allowing you to mark these angles on working material.
Most square heads also include:
- A spirit level, which is used to confirm that a surface is flat or plumb (vertically straight)
- And a scriber for marking your work
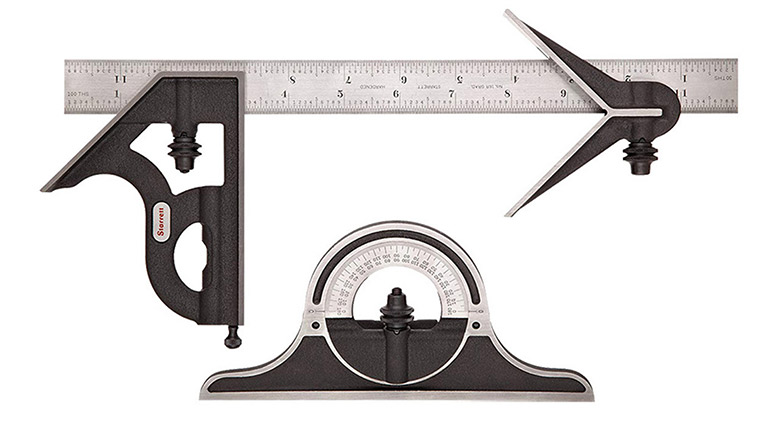
A more complex version of the combination square includes:
- The steel blade (or rule)
- The square head, as described above
- A protractor head used to measure exact angles
- A center head, which can be used to locate the center of round objects
Additionally, the center head can be used for confirming right angles and measuring 45-degree angles.
Most combination squares come in six- or 12-inch rule lengths, but they’re available in sizes up to 24 inches. Pricing for combination squares runs the gamut, and you get what you pay for. For example, a hardened steel combination square with a cast iron head (see these quality Starrett squares) can exceed $200, but will last more than your lifetime.
Testing your combination square
Before using your square, you should always test it for accuracy. One way to do this is to tape a piece of paper to a board with a perfectly straight edge.
Line the anvil of your combination square up with the edge and draw a line against the blade. Then flip over and draw a second line. The two lines should be parallel to ensure the accuracy of your tool.

6 ways to use a combination square
The strength of the combination square is its versatility. It comes in handy for a range of tasks, from measuring material for accuracy to laying out, or marking lines and angles on your work. The following are a handful of ways to use this do-it-all instrument.
1. Check for square
The most obvious use of a combination square is, of course, checking for “square,” or the accuracy of 90-degree angles.
For inside corners, simply adjust the ruler so the end lines up with the anvil. Set the combination square inside your work – for example, a drawer or a box – and line up with a corner. Look for any space between the edges of the tool and your work. If there are none, your 90-degree angles are accurate.
For outside corners, extend the ruler and hold the straight edge of the anvil against a corner of your work. The ruler should be flush against the edge. If there’s any daylight peeking through between the ruler and the material, the work is out of square.
2. Measure and mark 45-degree angles
Using a combination square to check 45-degree angles is the same as checking for square (as noted above). But instead of the anvil, you’ll measure your material against the shoulder.
To mark a 45-degree angle, line the shoulder of the combination square up with the edge of the material. Then draw a line along the blade to the shoulder (the same can be done for 90-degree angles by using the anvil to create a square edge).
3. Determine the center of round objects
Using a combination square with center head allows you to measure the exact center of round materials — for example, a piece of cylindrical metal bar stock.
Place the combination square on the object with the center head attached, and draw a line along the blade to mark the diameter. Then move the square to a new location and mark a second line. The center of the object should be where the lines intersect.
Not sure if your object is perfectly round?
Try making more than two diameter lines. If they all intersect at the same point, you’ll know the object is round. If they intersect at different points, the object isn’t perfectly round. In the case of the latter, you can use the points you’ve identified to choose an approximate center.
4. Use it as a level
Loosen the knob to remove the handle from the blade. Place the anvil against a surface and use it as a level. Check the vial to make sure the bubble is in the center. If it is, the material is level.
5. Use it as a ruler
Loosen the knob and remove the handle, and your blade becomes a standard ruler or straightedge.
6. Check for plumb
To check for plumb, set the edge of the blade against a vertical surface. If the bubble is in the center of the vial, the work is plumb.

Benefits of the combination square
The combination square is a must-have instrument thanks to its multi-use functionality. In a single project, you can use this tool for different purposes, such as checking for square, measuring depth, marking angles, and much more.
Accuracy is everything when it comes to your work. Using a combination square is an easy way to ensure higher precision in the lines, angles, and measurements of each project you complete.
FREQUENTLY ASKED QUESTIONS
- Why would I use a combination square?
In any industry, a combination square can help you achieve precise measurements when measuring angles, squareness, depth, lengths, and more.
As a machinist, you may use a combination square for layout work, measuring square and rectangle pieces from large stock, or measuring the center of round bar stock.
- How do I test a combination square for accuracy?
There are several ways to test a combination square for square. One way to do this is to tape a piece of paper to a board with a straight edge, and line the anvil of your square up with that edge. Draw a line along the blade, then flip it over and draw another. If the two lines are not parallel, your tool is out of square.
- What are the best combination squares available?
Higher Precision carries a variety of high-quality combination squares and combination square sets from the best brands. Here are some of our top picks of the many combination square products we offer.
Best top-of-the-line brand: Starrett Combination Squares
Laroy S. Starrett invented the combination square way back in 1877, so when it comes to this measurement tool, Starrett is the industry leader. Starrett combination squares comprise a photo-engraved, hardened and tempered steel blade, and an adjustable square head.
Best economy brand: SPI Combination Squares
SPI (Specialty Products & Insulation) has been distributing mechanical and building insulation products since 1982. Higher Precision is proud to carry the largest selection of SPI squares, which we recommend as a budget-friendly option.
GLOSSARY TERMS
- Combination square
The combination square is a multi-use measurement tool comprising a blade, or a metal rule, and an adjustable handle with a shoulder and anvil. It can be used for measuring and marking angles, checking for square and plumb, and measuring depth and material thickness. The square can also be used as a ruler or level, among other functions.
- Anvil
The longer, straight edge of a combination square handle used to measure 90-degree angles.
- Shoulder
The shorter, diagonal edge of a combination square handle that aligns the tool to a work surface at a 45-degree angle.
- Plumb
Vertically straight.